Search.recipeschoice.com - All Web Results, One Engine
Search: Yahoo, Microsoft Bing, YouTube, Wikipedia, Entireweb etc...-

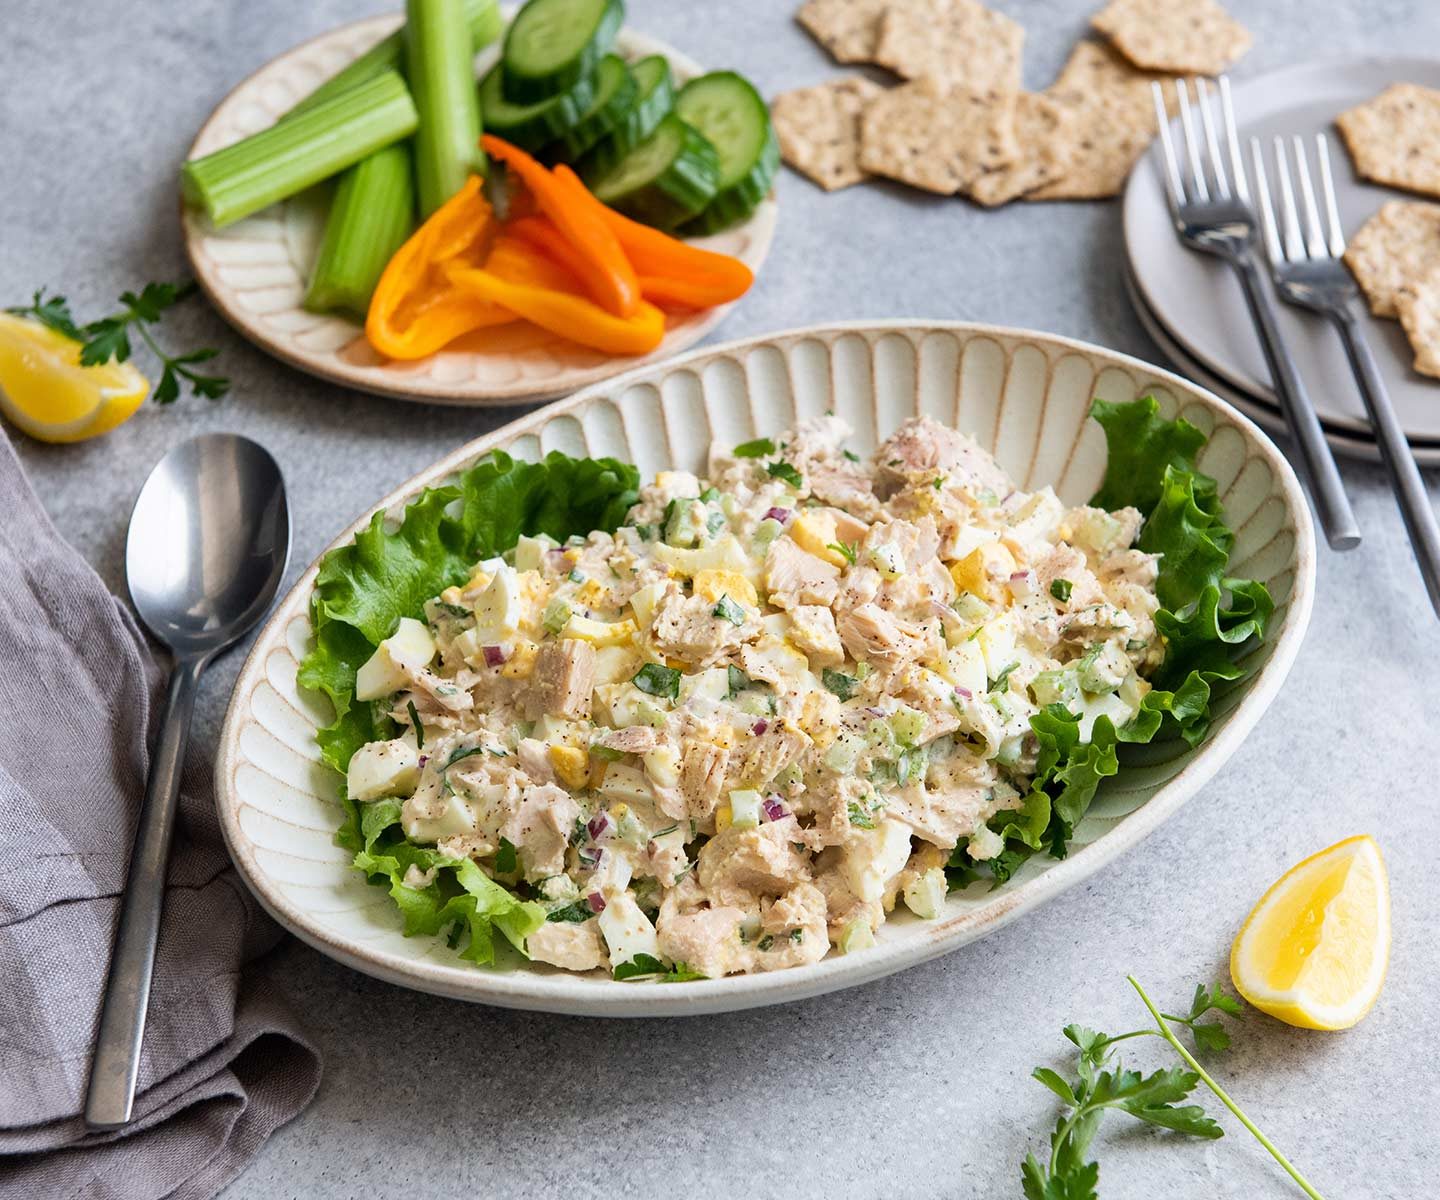
A Timeless Classic: The Tuna Salad with Egg
When looking for a quick, easy, and versatile meal or side dish, many people turn to tuna salad. This nostalgic recipe has stood the test of time and remains a reliable lunch or dinner option that is packed with protein and healthy fats. While tuna salad can certainly be enjoyed on its own, one small addition that takes this salad to the next level is incorporating hard-boiled eggs. The combination of tuna and egg creates a classic meal that has delighted generations. Benefits of the Tuna Salad with Egg There is a reason this salad stands as a relic of reliable nutrition even after all these years. Both tuna and eggs provide high-quality protein, essential fatty acids and other nutrients for balanced meals. Together in one dish, they deliver: Protein: Tuna and eggs team up to make this a complete protein powerhouse. Two ounces of canned light tuna contains around 11-12 grams of protein. Eggs also contain approximately 6 grams each. Protein helps you feel fuller longer and maintain muscle. Heart-Healthy Fats: Tuna contains Omega-3 fatty acids EPA and DHA, which aid brain and heart health. Eggs provide vitamin D, choline and healthy mono- and polyunsaturated fats. B Vitamins: Eggs are loaded with vitamins B5, B6, B12, and folate. These B vitamins help convert food into fuel and support healthy nerve and red blood cell function. Selenium: Just one egg contains over 20% of the RDI for selenium. This antioxidant mineral helps the immune system and thyroid function optimally. Versatility: Combining tuna and egg creates a salad that can be enjoyed as a simple, satisfying meal or packed into lunches on the go. With so much nutrition packed in one dish, it truly delivers. Read more: A Classic New York Deli Staple: Ason's Famous Potato Salad Classic Tuna Salad with Hard-Boiled Egg Recipe Making this timeless salad is simple and only requires a few basic ingredients. Feel free to tweak flavors by adding onions, celery or other mix-ins as preferred. Ingredients: 2 (5oz) cans light tuna in water, drained 2 hard-boiled eggs, diced or chopped 1/3 cup mayonnaise or salad dressing of choice 1 teaspoon Dijon or yellow mustard 1/4 teaspoon black pepper Pinch of salt (optional based on sodium in canned tuna used) Lettuce leaves (optional for serving) Tomatoes (optional for serving) Instructions: Drain tuna cans well and place drained tuna in a mixing bowl. flake it into smaller pieces with a fork. Peel and dice or chop boiled eggs and add to the tuna along with any desired diced vegetables like celery or onions. In a small bowl, mix mayonnaise or salad dressing with mustard and seasoning. Add to tuna mixture. Stir gently until just combined. Consider adding a splash of milk or lemon juice to lighten the mixture if needed. Taste and adjust seasoning as needed. Salt may not be required depending on sodium content in canned tuna used. Serve tuna salad on lettuce leaves or tomatoes if desired. Can also serve stuffed into a pita half, on crackers or enjoyed on its own. Store any leftovers in an air-tight container in the fridge for up to 4 days. Variations: Substitute Greek yogurt, low-fat mayonnaise or avocado for added creaminess. Add diced dill pickles, capers or olive tapenade for piquancy. Stir in diced red onion, celery, carrots or bell peppers. Top with extra chopped boiled egg, sriracha or everything bagel seasoning. Bake into tuna melts by topping sandwiches with cheese and broiling until melted. History of the Tuna Salad Recipe Canned tuna became popular in the United States in the early 20th century as a versatile and affordable protein option. In the post-World War II era, when canned and packaged foods reached new heights of popularity, tuna salad truly took off. Home cooks were looking for quick meal solutions to feed busy families amid major economic and social changes. Due to its simplicity, great taste, and nutrients, tuna salad met this need perfectly. Over the decades, the basic recipe remained fairly consistent - tuna, mayonnaise or salad dressing, diced celery, onion, salt and pepper. However, some recipes started incorporating hard-boiled eggs as well. The eggs added richness, texture, and protein while complementing the mild flavor of the tuna. This variation soon became just as widespread of a classic as the original tuna salad. Today, whether made with or without egg, tuna salad endures as a beloved simple meal. From simple sandwiches to tossed salads, this tuna salad allows for boundless combinations. The classic version proves that sometimes keeping recipes simple is best so the fresh flavors can truly shine. With high-quality protein and nutrition from both tuna and eggs, it's no wonder this salad remains a perennial favorite generations later. Give the time-tested tuna salad with egg a try - its unwavering goodness is sure to become part of your regular meal rotation too. Read more: Low-Carb Vegetarian Recipes: Delicious and Nutritious Meals One Skillet, Big Flavor: How to Make Marry Me Chicken
-
A Classic New York Deli Staple: Ason's Famous Potato Salad
There are certain iconic dishes that are synonymous with New York delis. Pastrami sandwiches, matzo ball soup, and of course - potato salad. While many delis serve up a tasty potato salad, one stands head and shoulders above the rest according to longtime New Yorkers - the potato salad from Ason's Deli on the Upper West Side of Manhattan. Famously creamy yet tangy, Ason's potato salad has been winning over customers for nearly 50 years. Let's take a look at the recipe and history behind this New York classic. [BLOCKAD] Ason's Deli first opened its doors in 1973 at 2644 Broadway. Founders Arthur and Roslyn "Cookie" Ason brought a true deli sensibility along with high quality ingredients to their corner establishment. From day one, Arthur's homemade recipes were a hit with locals, but none more so than his potato salad. Made with generous portions of mayonnaise, chopped eggs, celery and sweet onion, the salad had the perfect creamy yet brightly flavored blend. Word quickly spread across the neighborhood and soon Ason's was bustling, with potato salad flying out the door. While Arthur has since passed away, the family-run deli continues on under the guidance of Arthur and Cookie's son Alan. Baked goods, sandwiches and soups still draw in loyal customers on a daily basis. And of course, the ever-popular potato salad is still made fresh every morning using Arthur's classic yet secret recipe. Let's take a look at what actually goes into crafting this tried-and-true deli staple. Ason's Potato Salad Ingredients 4 pounds russet potatoes, peeled and diced into 1/2-inch cubes 1 cup mayonnaise 1/2 cup sour cream 1/4 cup white vinegar 1 teaspoon sugar 1 teaspoon celery seeds 1/2 teaspoon dill weed 1/4 teaspoon garlic powder 1/4 teaspoon black pepper 1 cup diced celery 1 cup diced onion 2 hard boiled eggs, peeled and diced Paprika for garnish The Process First, the potatoes are peeled and cubed. Placing them in a large pot, they are covered with cold water and brought to a boil over high heat. Once boiling, the heat is turned down and potatoes are allowed to simmer for about 15-20 minutes, until just tender when pierced with a fork but not falling apart. Drain well and transfer potatoes to a large mixing bowl. Allow to cool completely. In a medium bowl, whisk together the mayonnaise, sour cream, vinegar, sugar, celery seeds, dill, garlic powder and black pepper until smooth and blended. Pour the sauce over the cooled potatoes and gently fold together using a rubber spatula until well coated. Then fold in the diced celery, onion and eggs. Taste and adjust seasoning as needed, adding more salt, pepper, sugar or vinegar to taste. Transfer the potato salad to a serving dish, smoothing the top. Sprinkle a light dusting of paprika over the top for color. Cover and refrigerate for at least 2 hours before serving to allow flavors to blend. Best if made a day in advance for optimal flavor. Read more: Creative Vegetable Side Dishes: Elevating Everyday Meals The creamy yet lightly tangy homemade dressing is what truly sets Ason's potato salad apart. Full of fresh veggie chunks tucked into a rich but balanced sauce, each bite is a truly satisfying blend of flavors and textures. The key is using high quality ingredients like real mayo and sour cream, along with a balance of acid from white vinegar and brightness from diced celery and onion. Seasonings like garlic powder, dill and celery seeds enhance the natural potato flavor without overpowering. While most delis use recipes that are easier and faster with fewer fresh ingredients, Ason’s still takes the time to make theirs from scratch each morning. No shortcuts are taken - only top quality all-natural products. And the results truly show, with a creamy yet tangy finished salad unlike anything from a jar. No wonder locals and visitors alike continue craving a scoop every time they visit the deli. Over the years the recipe has remained unchanged, though Alan does admit to occasionally tinkering just slightly with amounts to keep things interesting. But the secret is really in using super fresh in-season potatoes along with high quality dairy and veggies. Attention to proper cooking, cooling and folding techniques also yields the perfect potato salad texture - not too loose yet still creamy and rich. Does Ason's ever think of franchising or sharing the secrets of their beloved recipe? Not likely. As Alan says, "This recipe is staying right here. People come to us for the real thing, made fresh every day. We couldn't replicate it elsewhere." And fans certainly appreciate the care and art that still goes into every batch. So the next time you find yourself at the counter of Ason's Deli, be sure to grab not just your pastrami on rye, but a generous scoop of their famous creamy yet tangy potato salad as well. A true New York delicatessen classic that's sure to delight your tastebuds. Bon appétit! Read more: Low-Carb Vegetarian Recipes: Delicious and Nutritious Meals Chicken Curry in a Slow Cooker: A Hands-Off Weeknight Dinner
-
Vanilla Pudding Cook and Serve: A Classic Dessert Worth the Effort
While store-bought pudding certainly has its place in the kitchen when you're short on time, nothing compares to the rich, creamy texture and pure vanilla flavor of homemade vanilla pudding. Made with just a few simple ingredients, vanilla pudding is one of the easiest and most satisfying desserts you can whip up. Whether eaten on its own or layered into parfaits and trifles, this comforting classic is sure to please both kids and adults alike. Here's a step-by-step guide to making and serving this sweet treat, collected by Recipeschoice. Ingredients and Equipment The ingredients needed for vanilla pudding are probably already in your pantry. You'll need: 2 cups milk (whole milk is best but 2% will also work) 1/2 cup sugar 3 tablespoons cornstarch 1/8 teaspoon salt 2 teaspoons vanilla extract Equipment: saucepan, wooden spoon, strainer or fine mesh sieve, measuring cups and spoons, 4-6 serving cups or bowls Making the Pudding Combine the sugar and cornstarch in a medium saucepan and whisk to blend well and break up any lumps of cornstarch. This will help prevent lumps from forming later. Gradually stir in the milk. Make sure there are no remaining lumps of cornstarch at the bottom of the pan. Cook the pudding over medium-high heat, whisking constantly, until it comes to a boil. Reduce heat slightly to a gentle simmer and continue whisking for 2 more minutes, until very thickened. Remove from heat and stir in the salt and vanilla extract. The salt enhances the flavor of the vanilla. For a smoother texture, pour the hot pudding through a strainer into a clean bowl, removing any bits of cooked starch. Or, just leave it in the saucepan if you don't mind a chunkier consistency. Lay a piece of plastic wrap directly onto the surface of the pudding to prevent a skin from forming. Allow the pudding to cool slightly, then cover and refrigerate for at least 2-3 hours until completely chilled before serving. The pudding will thicken further as it cools. Homemade vanilla pudding takes just 15-20 minutes of active cooking time but the end result is far superior to instant pudding mixes that use thickeners like cornstarch. Using whole milk adds richness while vanilla extract boosts the natural sweet cream flavor. All you need is a little patience to let it cool completely before enjoying! Read more: Homemade Cold Brew Coffee Recipes Tips for Perfectly Smooth Pudding Use a heavy-bottomed saucepan for even heating. Stainless steel works well. Whisk continuously while heating to prevent clumping. Cook until very thickened. For silkiest texture, pass hot pudding through a fine mesh strainer after cooking. Adding a piece of plastic wrap directly on the pudding's surface before refrigerating prevents a skin from forming. Extra vanilla flavor? Steep 1 split vanilla bean in the milk for 30 minutes before making the pudding. Customized Flavor Variations While plain vanilla is a classic, customized flavor variations allow you to get creative with your pudding. Here are some ideas to try: Chocolate pudding: Melt 4 oz semisweet chocolate chips into hot finished vanilla pudding. Fruit flavors: Add 1/2 cup pureed fruit like mangoes, berries or peaches after cooking. Spice it up: Infuse milk with cinnamon sticks, nutmeg or cardamom before cooking. Coffee pudding: Substitute 1/2 cup strong brewed coffee for 1/2 cup milk. Orange dream: Add 1 Tbsp grated orange zest and 2 Tbsp orange juice after cooking. Pep it up: Stir in 1/4 cup mini chocolate chips and crushed candy canes. Serving and Storing Vanilla Pudding Here are some ideas for how to enjoy your homemade vanilla pudding: In parfaits layered with fresh fruit like berries and sliced banana. In trifles with layers of cake or cookies, pudding and fruit. With a dollop of fresh whipped cream or gingerbread cookies on the side. With caramel, fudge or chocolate sauce for dipping. Cups of pudding make a good portable snack. Cooled pudding can be covered and stored in the fridge for 3-4 days. Be sure to lay plastic wrap directly on the surface before sealing to prevent skin. You can also freeze individual portions in an airtight container for up to 3 months. Simply thaw overnight in the fridge and stir before serving. With just a few basic ingredients, vanilla pudding is always a comfort. Whether eaten straight, dressed up with mix-ins or topped with fruit, the sweet vanilla cream more than makes up for the short cooking time. Enjoy this timeless dessert on its own or create many more flavor combinations—it's truly an easy homemade treat worth making again and again. Read more: Low-Carb Vegetarian Recipes: Delicious and Nutritious Meals
-
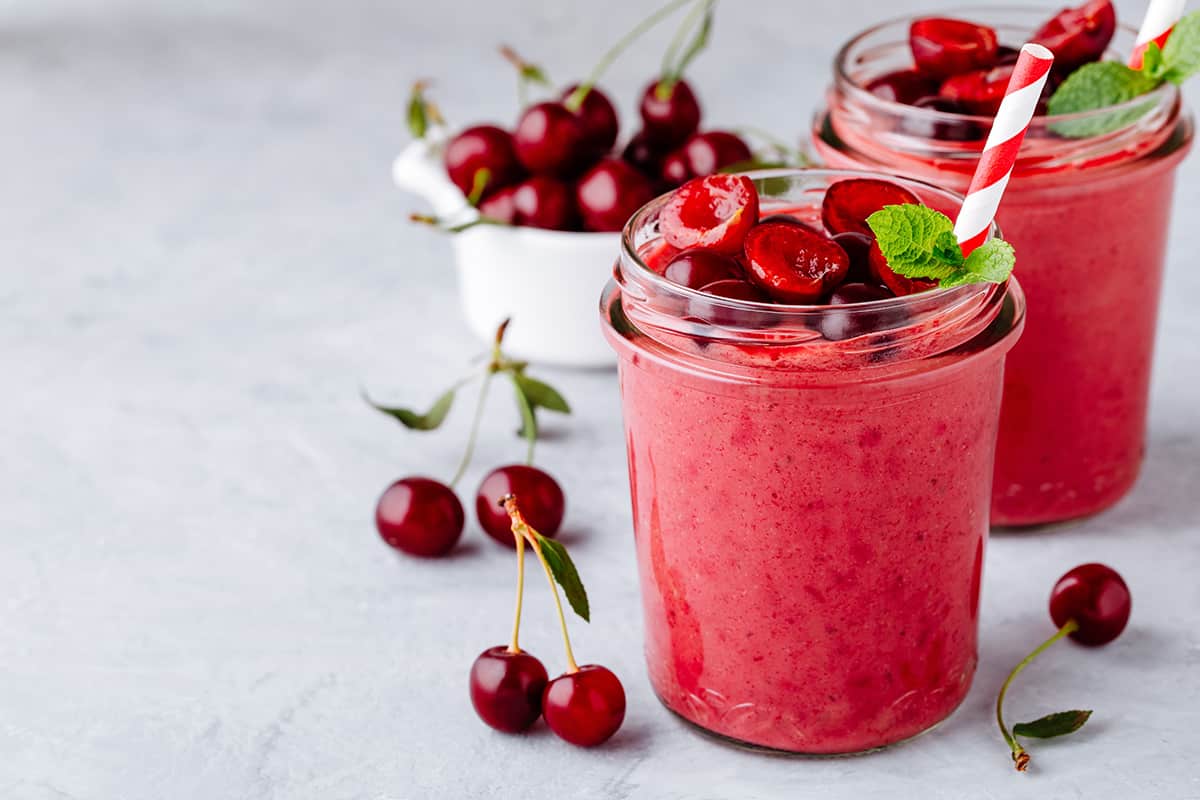
Delicious Dairy-Free Smoothie Recipes: A Guide to Plant-Based Perfection
Smoothies are a quick and nutritious way to start your day, refuel after a workout, or enjoy as a refreshing snack. However, many traditional smoothie recipes rely on dairy products like milk and yogurt for creaminess and texture. Whether you're lactose intolerant, vegan, or simply looking to cut back on dairy, there are plenty of delicious and nutrient-rich alternatives to create dairy-free smoothies that are just as creamy and flavorful. In this blog post, we’ll explore various dairy-free smoothie recipes that are easy to make, full of natural ingredients, and packed with vitamins, minerals, and antioxidants. These smoothies are perfect for everyone, from busy professionals to fitness enthusiasts, and they’ll help you fuel your body with wholesome, plant-based goodness. Why Choose Dairy-Free? Going dairy-free offers numerous benefits, including improved digestion for those who are lactose intolerant, reduced inflammation, and a lighter feeling after meals. Many dairy-free ingredients, such as plant-based milks and nut butters, are rich in healthy fats and essential nutrients, making them ideal for smoothie recipes. Plant-based alternatives such as almond milk, coconut milk, oat milk, and cashew milk provide the creamy base that dairy typically offers, while adding their own unique flavors. Additionally, using fruits, seeds, and vegetables enhances the nutrient profile of your smoothie, making it a powerhouse of energy. 1. Tropical Green Smoothie This tropical green smoothie is a delicious and refreshing way to incorporate more greens into your diet. It's packed with fiber, vitamins, and antioxidants, all while tasting like a tropical vacation. Ingredients: 1 cup spinach 1/2 cup frozen pineapple 1/2 cup frozen mango 1 banana 1 cup coconut milk (or any dairy-free milk of choice) 1 tbsp chia seeds Juice of 1/2 lime Instructions: Place all ingredients in a blender. Blend until smooth and creamy. Serve immediately for the freshest flavor. Why This Works: The spinach provides essential vitamins without altering the flavor, while the tropical fruits bring sweetness and brightness. Coconut milk adds a creamy texture, and chia seeds offer a boost of omega-3s and fiber. 2. Chocolate Peanut Butter Banana Smoothie For those with a sweet tooth, this dairy-free chocolate peanut butter banana smoothie is a perfect treat that feels indulgent but is actually healthy. It’s rich in protein and potassium, making it an ideal post-workout drink or dessert. Ingredients: 1 banana 1 tbsp natural peanut butter (or any nut butter) 1 tbsp unsweetened cocoa powder 1 cup almond milk 1/2 tsp vanilla extract 1 tsp maple syrup (optional, for extra sweetness) Ice cubes (optional for a thicker texture) Instructions: Combine all ingredients in a blender. Blend until smooth and frothy. Pour into a glass and enjoy. Why This Works: The combination of banana and peanut butter creates a creamy texture, while the cocoa adds a rich chocolate flavor without the need for dairy. Almond milk keeps the smoothie light, and the optional maple syrup adds natural sweetness. 3. Berry Coconut Smoothie Berries are a fantastic source of antioxidants, and when paired with creamy coconut milk, they create a vibrant and satisfying smoothie. This berry coconut smoothie is ideal for breakfast or as a mid-day snack. Ingredients: 1/2 cup frozen mixed berries (blueberries, strawberries, raspberries) 1/2 cup coconut yogurt (dairy-free) 1 cup coconut water 1 tbsp ground flaxseeds 1 tsp honey or agave syrup (optional) Instructions: Add all ingredients to a blender. Blend until the mixture is smooth. Pour into a glass and enjoy the fruity, refreshing taste. Why This Works: The coconut yogurt and water give the smoothie a tropical base, while the mixed berries provide antioxidants, vitamins, and a natural sweetness. Flaxseeds offer extra fiber and omega-3s, making this smoothie both nourishing and delicious. 4. Creamy Avocado & Cucumber Smoothie Avocado might not be the first ingredient you think of for smoothies, but it provides an ultra-creamy texture and is full of healthy fats. This avocado and cucumber smoothie is cool, hydrating, and packed with nutrients. Ingredients: 1/2 ripe avocado 1/2 cucumber, peeled and chopped 1/2 cup spinach 1/2 cup coconut water or almond milk Juice of 1/2 lemon Fresh mint leaves (optional) Ice cubes Instructions: Blend all ingredients until smooth and creamy. Pour into a glass and garnish with mint leaves for an extra refreshing touch. Why This Works: Avocado’s healthy fats add creaminess and make the smoothie filling, while cucumber and spinach add hydration and fiber. The lemon juice and mint bring a fresh, zesty flavor to balance the richness of the avocado. Related: Homemade Cold Brew Coffee Recipes 5. Mango and Turmeric Smoothie This vibrant mango and turmeric smoothie is both delicious and beneficial for your health. Turmeric is known for its anti-inflammatory properties, and paired with sweet mango and coconut milk, it creates a golden, nutrient-packed smoothie. Ingredients: 1 cup frozen mango chunks 1/2 tsp turmeric powder 1 banana 1 cup coconut milk 1 tsp fresh grated ginger (optional) 1 tsp maple syrup or honey (optional) Instructions: Add all ingredients to the blender and blend until smooth. Pour into a glass and enjoy the bright, tropical flavors. Why This Works: The natural sweetness of mango and banana complements the earthy spice of turmeric. Coconut milk makes the smoothie creamy and satisfying, while ginger adds a subtle warmth. 6. Strawberry Basil Smoothie This strawberry basil smoothie is a unique twist on a classic fruit smoothie. The basil adds a refreshing herbal note that pairs surprisingly well with the sweetness of strawberries, creating a sophisticated yet simple dairy-free smoothie. Ingredients: 1 cup frozen strawberries 1/2 cup oat milk or almond milk 1 tbsp fresh basil leaves 1 tbsp hemp seeds 1 tsp lemon juice 1 tsp agave syrup (optional) Instructions: Blend all ingredients until smooth and creamy. Serve chilled and garnish with a fresh basil leaf for an elegant touch. Why This Works: The combination of strawberries and basil is unexpected but delicious. Basil adds a fragrant, refreshing quality, while hemp seeds provide plant-based protein and healthy fats. Oat milk keeps the smoothie light and dairy-free. 7. Pumpkin Spice Smoothie Perfect for fall or any time you’re craving something cozy, this pumpkin spice smoothie is packed with flavor and nutrients. Using canned pumpkin puree makes it quick to prepare, and the warm spices make it taste like autumn in a glass. Ingredients: 1/2 cup pumpkin puree 1 banana 1 cup unsweetened almond milk 1 tsp pumpkin pie spice 1 tbsp almond butter 1 tsp maple syrup (optional) Ice cubes Instructions: Add all ingredients to a blender and blend until smooth. Pour into a glass and sprinkle with extra pumpkin spice if desired. Why This Works: Pumpkin puree adds a rich texture and provides beta-carotene and fiber. The combination of almond butter and banana makes this smoothie creamy and satisfying, while the pumpkin spice gives it a comforting, warm flavor. Conclusion Dairy-free smoothies are a fantastic way to enjoy creamy, flavorful drinks without the need for milk or yogurt. Whether you prefer fruity blends, rich chocolatey treats, or refreshing green smoothies, there’s a dairy-free option for every taste and occasion. Experimenting with plant-based ingredients like almond milk, coconut milk, avocado, and nut butters allows you to create nutrient-packed smoothies that are both healthy and delicious. Try out these recipes and enjoy a wide range of dairy-free smoothies that will energize your mornings, refuel your workouts, and satisfy your sweet cravings without the use of dairy. Your blender is your best friend on this dairy-free journey, so get creative and enjoy the wholesome goodness of plant-based smoothies! Related: Low-Carb Vegetarian Recipes: Delicious and Nutritious Meals
-
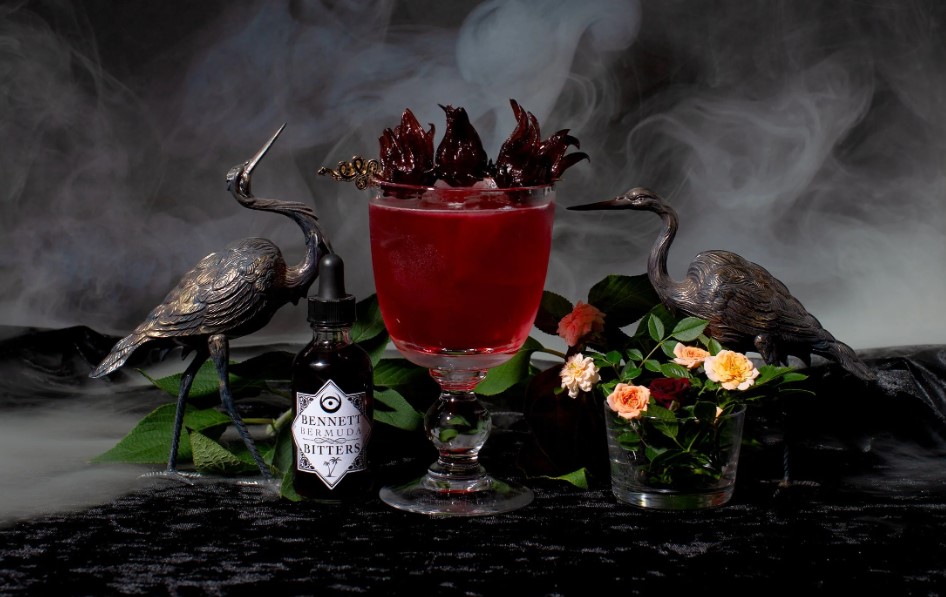
Boo-tiful & Balanced: The Perfect Black Widow Cocktail Recipe for Halloween
Halloween is a time for fun, creativity, and indulging in all things spooky, but it doesn't have to mean unhealthy choices. Today, I'm excited to share with you a delightful and slightly mysterious Black Widow Cocktail that fits perfectly into your Halloween festivities, while still being a healthier option compared to many sugary cocktails. This drink is not only stunningly dark and elegant, but it also strikes a balance between flavor and nutrition, with fresh fruit juices and a controlled alcohol content. If you’re looking for a cocktail that combines both sophistication and spookiness, this Black Widow Cocktail is the perfect blend of style and substance. With a rich, deep color and the tartness of blackberries paired with the smooth finish of vodka and black raspberry liqueur, this drink will delight your Halloween guests without overwhelming them with sugar or artificial ingredients. Plus, it’s quick and easy to make, giving you more time to enjoy the festivities. Let’s break this down into sections so you can whip up your own Black Widow Cocktail with ease. Ingredients First things first, let’s gather all the ingredients you’ll need for this cocktail. I’ve kept the list simple to make sure the drink is both delicious and easy to prepare. Additionally, most of these ingredients can be found at your local grocery or liquor store, so there's no need for an elaborate shopping spree. For the Cocktail: Vodka – You can use any good-quality vodka for this recipe. Vodka adds a clean and neutral base, allowing the fruit flavors to shine. Black Raspberry Liqueur – I recommend using Chambord, a luxurious black raspberry liqueur that brings a deep fruity flavor and a rich, velvety texture to the cocktail. If you’re looking for an alcohol-free option, you can substitute it with black raspberry syrup. Cranberry Juice – Opt for 100% pure cranberry juice with no added sugars. This will provide a slightly tart flavor to balance the sweetness of the liqueur, while also keeping the drink light and refreshing. Fresh Lime Juice – Freshly squeezed lime juice adds a bright, zesty note to the drink, elevating the overall flavor and providing a refreshing citrus kick. For the Garnish: Blackberries – Not only do blackberries serve as a beautiful garnish, but they also contribute to the drink's natural sweetness and nutrients, like antioxidants and fiber. Fresh is best, but frozen will work if that’s all you have on hand. Related: Bring the Magic of Hogwarts Home with This Quick and Easy Butterbeer Recipe Guide Now that we have our ingredients ready, let’s walk through the simple process of creating this elegant Black Widow Cocktail. It’s quick to make, and whether you’re a cocktail enthusiast or a beginner, you’ll have no trouble following these steps. Step 1: Mix Ingredients Start by filling your cocktail shaker with ice. This will ensure that your drink is perfectly chilled and refreshing when served. Once your shaker is ready, add: 2 ounces of vodka 1 ounce of black raspberry liqueur (Chambord) 2 ounces of cranberry juice 1/2 ounce of fresh lime juice These measurements are for a single serving, so if you’re making drinks for multiple guests, just multiply the quantities accordingly. The vodka provides the base, while the black raspberry liqueur adds a fruity sweetness. Cranberry juice cuts through that sweetness with a bit of tartness, and the lime juice brightens the whole mix with its citrus zing. Step 2: Shake Seal your cocktail shaker and give it a good shake! You want to shake it well, for about 15-20 seconds. This not only mixes the ingredients together, but it also chills them, giving the drink that crisp, cold taste. A well-shaken cocktail is a sign of a pro, so don’t be shy about shaking vigorously. Step 3: Strain and Serve Once your cocktail is thoroughly mixed and chilled, it's time to strain it. You can pour the cocktail into a glass filled with ice if you prefer your drinks on the rocks, or go for a more elegant presentation by straining it into a chilled martini glass. Both options are great, but for a classier Halloween vibe, I recommend serving it in a martini glass. Step 4: Garnish Finally, we’re adding the finishing touches. Garnish your drink with a few fresh blackberries. You can drop them into the glass or spear them on a cocktail stick for a more decorative touch. The blackberries add a gorgeous pop of color, and their natural sweetness pairs wonderfully with the flavors in the drink. Related: Vanilla Pudding Cook and Serve Nutrition One of the best things about this Black Widow Cocktail is that it's relatively light in calories and sugar compared to many other Halloween cocktails. By using fresh juices and controlling the amount of alcohol and liqueur, this cocktail is a healthier choice without sacrificing flavor. Let’s break down the nutritional aspects of this delicious concoction. Serving Size: The recipe above yields 01 cocktail, but it’s easy to adjust the quantities depending on how many people you’re serving. Calories: This drink contains approximately 160-180 calories per serving, depending on the specific brands of vodka and liqueur you use. For those watching their calorie intake, you can slightly reduce the amount of black raspberry liqueur to lower the calorie count without sacrificing too much flavor. Sugar Content: The natural sugars in cranberry juice and black raspberry liqueur give this cocktail its sweetness, but you’re not overloading it with artificial sweeteners or syrups. If you’re concerned about sugar, opt for 100% unsweetened cranberry juice. On average, this drink contains around 12-14 grams of sugar per serving. Alcohol Content: The alcohol content of this cocktail will vary depending on the vodka and liqueur you choose. Vodka typically has an alcohol by volume (ABV) of around 40%, and black raspberry liqueur like Chambord has an ABV of around 16.5%. A standard serving will contain about 16-20 grams of alcohol, making this a moderate-strength cocktail. Health Benefits: While we don’t often think of cocktails as being “healthy,” the Black Widow Cocktail does have some redeeming nutritional qualities! Cranberry juice is known for its high antioxidant content and benefits for urinary tract health. The lime juice adds a dose of vitamin C, while the blackberries provide additional antioxidants and fiber. Moderation is key, but you can enjoy this cocktail knowing it has some nutritious ingredients as well. Total Cook Time One of the highlights of the Black Widow Cocktail is its quick preparation time. You won’t be spending hours in the kitchen, and that’s especially helpful when you’re busy hosting a Halloween gathering. Preparation Time: From start to finish, this cocktail takes only 5 minutes to prepare. That includes the time it takes to mix, shake, and garnish your drink. If you’re making multiple servings, it may take a few extra minutes, but the process remains quick and simple. Serving Suggestions The Black Widow Cocktail is a showstopper at any Halloween party, but it pairs beautifully with a range of Halloween treats and savory dishes. Its tart and sweet flavor makes it a versatile drink that can be enjoyed alongside both snacks and more substantial meals. Here are a few ideas on how to serve this cocktail for a memorable Halloween event: Savory Bites: Pair the Black Widow Cocktail with finger foods like cheese boards, charcuterie, or roasted nuts. The light and fruity flavors of the drink will contrast nicely with the richness of these savory treats. Spooky Appetizers: Serve alongside spooky-themed appetizers like deviled eggs with olive “spiders,” mini pumpkin tarts, or roasted veggie skewers. Sweet Treats: If you have a sweet tooth, this cocktail is delicious with Halloween-themed desserts like black velvet cupcakes, dark chocolate truffles, or a simple plate of dark berries. Whether you’re hosting a full-blown Halloween bash or just having a few friends over for cocktails, this drink sets the tone for a stylish, healthy, and festive evening. Related: Bubble Up Halloween Fun with Easy Witches' Brew Lemonade Final Thoughts The Black Widow Cocktail is the perfect blend of elegance, flavor, and spookiness for your Halloween celebrations. With its dark, alluring color and its balanced combination of sweet and tart flavors, it’s sure to be a hit with your guests. Plus, you can feel good about serving a drink that’s relatively low in calories and sugars, making it a healthier option for the holiday. This Halloween, treat yourself and your guests to a cocktail that’s both delicious and mindful of nutrition. The Black Widow Cocktail is more than just a drink – it’s a statement of sophisticated fun. Happy Halloween, and cheers to a healthy, flavorful celebration!
-
Best BBQ and Grilling Recipes: From Classic Favorites to Creative Twists
There’s nothing quite like firing up the grill and cooking outdoors, especially when the weather is perfect. BBQ and grilling bring out the best in food, creating smoky, charred flavors that elevate simple ingredients. Whether you're cooking for a family gathering, a summer cookout, or just craving some deliciously grilled dishes, mastering BBQ and grilling recipes can turn any meal into a memorable feast. In this blog, we’ll explore a wide range of BBQ and grilling recipes, from classic American favorites like ribs and burgers to more adventurous dishes such as grilled seafood, veggies, and even desserts. These recipes are designed to inspire both beginners and seasoned grillers, with flavors that will satisfy everyone around the table. 1. Classic BBQ Ribs BBQ ribs are the quintessential American BBQ dish, loved for their tender meat, smoky flavor, and sweet-spicy glaze. The key to making perfect ribs is a slow cooking process that allows the meat to become fall-off-the-bone tender while absorbing all the delicious BBQ flavors. Ingredients: 2 racks of pork ribs 1 cup BBQ sauce (homemade or store-bought) Dry rub (paprika, garlic powder, onion powder, brown sugar, salt, and pepper) Apple cider vinegar for basting Instructions: Preheat your grill to low heat (around 250°F). Rub the dry spice mixture all over the ribs and let them sit for about 30 minutes. Place the ribs on the grill, bone-side down, and cook for 2.5 to 3 hours. Baste occasionally with apple cider vinegar for extra moisture. During the last 30 minutes, brush the ribs with BBQ sauce and cook until caramelized. Let the ribs rest for 10 minutes before slicing and serving. Why It’s a Hit: BBQ ribs are a crowd-pleaser, offering the perfect blend of smoky, sweet, and spicy flavors. The slow-cooked tenderness combined with a rich BBQ glaze makes them irresistible. 2. Juicy Grilled Burgers No BBQ is complete without the classic burger. While grilling a burger seems simple, achieving the perfect balance of juiciness, flavor, and that ideal sear takes a bit of know-how. A great burger starts with high-quality beef and minimal handling to keep the patties tender. Ingredients: 1 lb ground beef (80/20 mix for optimal juiciness) Salt and pepper to season Burger buns Toppings: lettuce, tomatoes, cheese, pickles, and condiments Instructions: Preheat your grill to medium-high heat. Form the ground beef into patties, about ½ inch thick. Press a slight indent in the center of each patty to prevent bulging while grilling. Season both sides with salt and pepper. Grill the patties for 4-5 minutes per side, or until they reach your desired level of doneness. Toast the buns on the grill for a minute before assembling with your favorite toppings. Why It’s a Hit: Burgers are a BBQ staple that can be customized to fit any taste. The combination of a juicy, grilled patty and a soft toasted bun is simply unbeatable. 3. Grilled Vegetable Skewers For a healthy and colorful side dish or a vegetarian option, grilled vegetable skewers are perfect. Grilling veggies brings out their natural sweetness while giving them a smoky flavor. Plus, they’re easy to prepare and cook quickly. Ingredients: Bell peppers, zucchini, cherry tomatoes, red onion, and mushrooms (or any other favorite veggies) Olive oil Salt and pepper Fresh herbs (optional) Instructions: Preheat the grill to medium heat. Cut the vegetables into even-sized chunks and thread them onto skewers. Drizzle with olive oil and season with salt, pepper, and fresh herbs. Grill for about 8-10 minutes, turning occasionally, until the vegetables are tender and slightly charred. Serve as a side or a light main dish. Why It’s a Hit: Grilled vegetables are a healthy, flavorful addition to any BBQ spread. The natural sweetness of the veggies paired with the smoky grill marks makes this dish both nutritious and delicious. 4. Grilled Shrimp Skewers with Garlic Butter Grilling seafood might seem intimidating, but shrimp cook quickly and absorb smoky flavors beautifully. When marinated in garlic butter, grilled shrimp become a light yet flavorful addition to your BBQ repertoire. Ingredients: 1 lb large shrimp (peeled and deveined) 3 tablespoons butter, melted 2 cloves garlic, minced Lemon wedges for serving Salt, pepper, and fresh parsley for garnish Instructions: Preheat the grill to medium-high heat. In a small bowl, mix melted butter with minced garlic. Thread the shrimp onto skewers and brush them with the garlic butter. Grill the shrimp for about 2-3 minutes per side, until pink and opaque. Remove from the grill, squeeze lemon juice over the shrimp, and garnish with fresh parsley. Why It’s a Hit: Shrimp cooks quickly on the grill, making it a perfect option for an appetizer or main dish. The garlic butter adds richness and enhances the natural sweetness of the shrimp, while the grill gives it a lightly charred, smoky flavor. Related: Chicken Curry in a Slow Cooker: A Hands-Off Weeknight Dinner 5. BBQ Chicken Thighs Chicken thighs are ideal for grilling because they stay juicy and flavorful, even over high heat. Marinated in a zesty BBQ sauce, grilled chicken thighs become tender with crispy, caramelized skin. Ingredients: 6 chicken thighs (bone-in, skin-on) 1 cup BBQ sauce Olive oil for brushing Salt and pepper to taste Instructions: Preheat the grill to medium-high heat. Season the chicken thighs with salt and pepper, and brush lightly with olive oil. Place the thighs skin-side down on the grill and cook for 5-6 minutes, then flip and cook for another 5-6 minutes, basting with BBQ sauce. Continue grilling and basting until the chicken reaches an internal temperature of 165°F. Let the chicken rest for a few minutes before serving. Why It’s a Hit: BBQ chicken thighs offer juicy meat with crispy skin, a combination that’s hard to resist. The BBQ sauce caramelizes beautifully over the grill, creating a rich, flavorful glaze. 6. Grilled Corn on the Cob with Herb Butter Grilled corn is a classic side dish at BBQs, and it’s even better when paired with a homemade herb butter. The grill enhances the corn’s sweetness while adding a smoky char, and the butter brings a rich, savory element to the dish. Ingredients: 4 ears of corn, husked 4 tablespoons butter, softened Fresh herbs (such as parsley, cilantro, or thyme) Salt and pepper Instructions: Preheat the grill to medium heat. Brush the corn with a little olive oil and place it on the grill. Grill the corn for about 10-12 minutes, turning occasionally until charred. In a small bowl, mix softened butter with fresh herbs, salt, and pepper. Once the corn is cooked, spread the herb butter over each ear and serve hot. Why It’s a Hit: Corn on the cob is a BBQ favorite, and grilling it adds a deliciously smoky flavor. The herb butter enhances the natural sweetness of the corn, making it a perfect side for any grilled main. 7. Grilled Pineapple with Cinnamon Sugar Don’t forget dessert when grilling! Grilled pineapple with cinnamon sugar is a simple, healthy, and refreshing way to end a BBQ meal. The grill caramelizes the pineapple’s natural sugars, creating a sweet, juicy treat. Ingredients: 1 fresh pineapple, sliced into rings 2 tablespoons brown sugar 1 teaspoon cinnamon Instructions: Preheat the grill to medium heat. In a small bowl, mix the brown sugar and cinnamon. Brush the pineapple slices with a little olive oil and sprinkle with the cinnamon sugar mixture. Grill the pineapple for about 2-3 minutes per side, until caramelized and golden. Serve warm, optionally with a scoop of vanilla ice cream. Why It’s a Hit: Grilled pineapple is naturally sweet and pairs perfectly with the smoky flavors from the grill. The cinnamon sugar adds a touch of spice, making this an easy and delicious dessert. Conclusion Whether you’re grilling for a casual family dinner or a festive summer BBQ, these recipes offer a wide variety of flavors and techniques to elevate your grilling game. From classic ribs and burgers to more creative dishes like grilled shrimp and pineapple, there’s something for everyone to enjoy. Remember, grilling is all about embracing bold flavors and enjoying the process of cooking outdoors. So fire up your grill and try out these best BBQ and grilling recipes—you’ll have everyone asking for seconds! Related: Kid-Friendly Lunchbox Ideas: Nutritious, Fun, and Easy to Pack
:max_bytes(150000):strip_icc()/SIMPLY-RECIPES-Classic-Potato-Salad-LEAD-2-Horizontal-3dc58bbc058844cbb1e9242e8b1515a7.jpg)